

To accurately print 3D parts in color, one must first have a thorough understanding of how color works.
What is Color?
Color is subjective and fluid.
We do not all see color the same way. It is virtually impossible to achieve a consensus around any color. Even if we could, color is a fluid property influenced by its context.
The colors our eyes see are affected by three factors in addition to the color itself:

As this picture depicts, color is only one of four measurable factors that affect an object’s appearance.
- GLOSS is the measure of light reflected from the surface of the color. When light bounces back from the surface in many different angles, in different directions, the item appears glossy, or shiny. When light is absorbed or cleanly refracts off the surface in a single angle, the item appears less glossy, or more matte.

- TRANSLUCENCY and transparency are the degree to which light passes through the color’s surface, or does not.
- TEXTURE denotes the consistency of the surface, whether its smooth or patterned.
On top of that, perceived color is influenced by 3 additional factors that are harder to measure:
- PHYSICAL LIMITATIONS (influenced by age of viewer, poor color memory retention, retinal fatigue)
- SUBJECTIVITY (culture, expectations, mood)
- RELATIVITY (background, contrasts, neighboring colors)
- LIGHTING (type of light source, shade, brightness, white point)
To expand on just some of these more general factors:
- Age: The human eye ages and becomes less adept at perceiving colors, casting a yellow tint on every color it beholds.
- Poor color memory: Thanks to retinal fatigue, distinguishing colors across any extended distance or period of time is extremely difficult and eventually physiologically impossible as the chemical in the eye responsible for sending the message depletes. Just ask anyone who’s had to choose from color swatches for a renovation!
And here are some visuals that expand on a few more:
- Lighting. The pictures below show how color can change when placed in different lighting. That’s because the environment actually changes how color is rendered, that is, how true it stays to its hue. Manufacturers adjust their product colors based on whether they will be used in sunlight or a department store showroom. And when necessary, the photography and film industry will apply a white, neutral, or grey balance to their images to adjust the mix of colors in a frame and alter which colors actually appear. This color-correction technique also guides the concept behind Instagram filters.

- Reflectivity. The degree to which a color absorbs or reflects light changes the color your eye actually sees. If you take two identical shades of blue and make one reflective and one not, the eye will perceive them as different colors. In the picture of a building below, we can see that the closed windows that reflect sunlight take on a different hue than the open window at a different angle which does not reflect sunlight.

- Surroundings & Background. Below we see a picture of two hearts on a white background, followed by a picture of two hearts on a colored background. The colored background in the second picture makes the hearts look purple and yellow even though they’re not. Sometimes a color that we’re seeing is in fact a blend of different colors altogether. In fact, the white background on this screen is actually a mixture of red, green, and blue pixels.


As we see, color is subjective, fluid, and affected by so many factors, tangible and intangible.
Given this situation, how can someone describe and define a desired color and communicate it to a person or to a printer?
The solution is to break down color to its basic building blocks of wavelengths, to assign each color a designated spot on the light spectrum.
This gives each color an objective coordinate untouched by context or human perception.
What is Color Made Out Of?
Colors are wavelengths of light, projected by the sun or another light source and reflected in different ways, which the receptors in our eyes perceive as colors.
The figure below shows the full spectrum of visible light as wavelengths, or colors.

The naked human eye can detect a narrower range of colors within this spectrum.
The naked human eye can detect a narrower range of colors within this spectrum.
Here are those colors again, this time standing on their own:

This is a color space. Color spaces indicate a given range of colors, or color gamut, measured and defined according to a specific device. Each device measures and defines color in a different way.
Specifically, this is the Lab Color Space, or all the colors visible to the human eye.
It’s helpful to keep in mind that the Lab Color Space only encompasses about one million colors, so any range boasting to be larger than that is unnecessary, as the human eye won’t be able to distinguish those additional colors.
Naming Each Color on the Lab Color Space
We mentioned that the solution to color’s subjectivity and abstractness is to give each color that the eye can see a scientific, objective location in a 3D space.
Each color in this gamut has a graphical coordinate to locate it on the spectrum. This coordinate allows us to refer to colors as absolute locations in the Lab Color Space, providing a solution to the inherent subjectivity and fluidity of color.

CIE-Lab Color Space – Source: https://www.colorcodehex.com/color-model.html
Color Tolerance and DE Bands
Just as there are varying levels of part tolerance in mechanical engineering, each 3D color part has its own level of tolerance for color variation. The delta equation below is a mathematical equation that calculates the DE band, meaning the Euclidean distance between two colors in the Lab color space, indicating how true the color printed is to the color you intended.
In terms of this equation, if the discrepancy between the color you wanted and the color the printer produced is less than 5.0, this is usually considered an acceptable tolerance. That’s why you may be asked for your DE band when speaking to a color expert.
Using this unambiguous mathematical equation provides further clarity when defining and communicating colors for 3D printing.

Working With a Printer’s Color Gamut
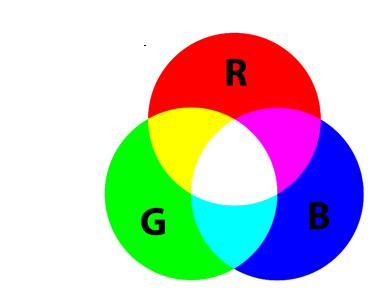
Computer monitors work off an sRGB color space. RGB stands for red, green, and blue. In RGB, colors are achieved by subtracting from a white base.
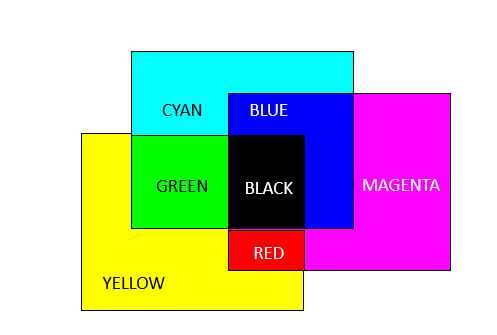
Printers, on the other hand, work off a CMYK color space and therefore, they offer a slightly different range of colors. CMYK stands for cyan, magenta, yellow, key. You achieve color by adding hues to a white base, reducing the amount of light reflected to the eye.
RGB always produces more vivid colors because the monitor is itself a light source.
The 2D printing color gamut.
CMYK produces less vivid colors than RGB because the colors subtract light from white instead of adding to it.
As we touched on above, the range of colors that RGB, CMYK, and other color spaces each encompass is called a gamut.
The 3D printing color gamut.
Pantone, a recognized authority in the color and design industry, offers a standardized color key, encompassing both of these color gamuts, and more:

How This Affects Printing
As we mentioned, computer monitors use RGB while 2D and 3D printers use CMYK.

Source: Graphic Design 102: The Art and Science of Color – 8. Printing RGB vs. CMYK (by Mark Gatter)
As you can see in the image above, many but not all colors align perfectly in RGB and CMYK. When they don’t, the printing software automatically shifts the colors to fit the CMYK gamut.
This shifting of colors is what can cause colors to appear differently in a printed object than they do on screen.
In other words, the colors being displayed on the computer monitor are simply not always the colors that appear in the object.
Compounding this discrepancy is the fact that computer monitors are not calibrated uniformly. Different monitors can display different colors, even within the same brand of computer hardware. All the factors that affect color, discussed in the first section, can further affect the issue.
In the 2D printing industry, this situation is well known. What’s not well known is how to print color parts in 3D. This tutorial explains the basics of how to set up a workflow to adjust colors properly. Future tutorials will go into more detail.
3D Printing
There are several categories of 3D color printing. We’ll be focusing on PolyJet printers, such as our Stratasys J750, since they’re quite versatile in terms of colors, transparencies, full-part realism, textures, and overall look and feel.
Matching Color in 3D Printing
Just as in 2D printing, 3D color print jobs require a color proofing procedure. This involves profile rendering, and then proofing the results. We describe the process for both phases below, using the Stratasys J750 printer.
How Profile Rendering Works
We mentioned that 3D printers need to convert the color input that they receive in the RGB gamut into the CMYK gamut. When some RGB colors fall outside the CYMK gamut, they need to be assigned a different color. 3D printers deal with this in one of two ways:

- ABSOLUTE RENDERING INTENT moves just the colors that fall outside of the gamut to the nearest point within it. The colors that already exist within the intended gamut do not move.
- RELATIVE RENDERING INTENT shifts all the colors proportionately, so that they fit within the CYMK gamut.
Each type of rendering intent offers advantages and disadvantages, depending on the object in question. Absolute rendering intent might produce a part with some converted colors immediately looking out of place in an obvious manner, whereas relative rendering intent might produce a part that looks fine in isolation until compared to the original intended colors.
Product designers choose the type of rendering intent on a case-by-case basis and check the results by proofing.
How Proofing Works
- In soft proofing, designers check the preliminary results on a computer before printing, for example, in Photoshop.
- In hard proofing, designers print the object and compare it to a color swatch or plastic chip to see if it matches. They iterate as needed, to achieve the desired result. A designer can start with soft proofing and then progress to hard proofing, as necessary.
You might like: Printing Full-Color FED Results on 3D Printers
Be the first to post a comment.